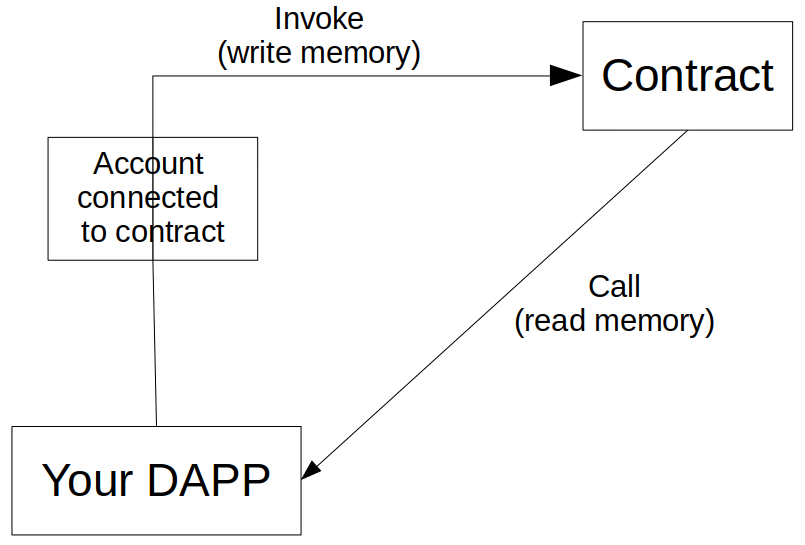
Interact with your contract
Once your provider, contract, and account are connected, you can interact with the contract:
- you can read the memory of the contract, without fees.
- you can write to memory, but you have to pay fees.
- On Mainnet, you have to pay fees with bridged STRK or ETH token.
- On Testnet, you have to pay with bridged Sepolia STRK or Sepolia ETH token.
- On Devnet, you have to pay with dummy STRK or ETH token.
Your account should be funded enough to pay fees (20 STRK should be enough to start).
Here we will interact with a test.cairo contract (Cairo 1) already deployed in Sepolia Testnet at the address:
This contract contains a storage variable called balance.
- It can be read with the
fn get_balance(self: @TContractState) -> felt252; - Balance can be modified with
fn increase_balance(ref self: TContractState, amount: felt252);
import { RpcProvider, Contract, Account, ec, json } from 'starknet';
🔍 Read from contract memory, with meta-class
To read the balance, you need to connect an RpcProvider and a Contract.
You have to call Starknet, with the use of the meta-class method: contract.function_name(params) (here params is not necessary, because there are no parameters for the get_balance function).
//initialize provider with a Sepolia Testnet node
const provider = new RpcProvider({ nodeUrl: `${myNodeUrl}` });
// Connect the deployed Test contract in Sepolia Testnet
const testAddress = '0x02d2a4804f83c34227314dba41d5c2f8a546a500d34e30bb5078fd36b5af2d77';

// read the ABI of the Test contract
const { abi: testAbi } = await provider.getClassAt(testAddress);
if (testAbi === undefined) {
  throw new Error('no abi.');
}
const myTestContract = new Contract(testAbi, testAddress, provider);

// Interaction with the contract with call
const bal1 = await myTestContract.get_balance();
console.log('Initial balance =', bal1); // Cairo 1 contract
// With Cairo 0 contract, `bal1.res.toString()` because the return value is called 'res' in the Cairo 0 contract.
// With Cairo 1 contract, the result value is in `bal1`, as bigint.
✍️ Write to contract memory, with meta-class
To increase the balance, you need in addition a connected and funded Account.
You have to invoke Starknet, with the use of the meta-class method: contract.function_name(params)
After the invoke, you have to wait the incorporation of the modification of Balance in the network, with
await provider.waitForTransaction(transaction_hash)
By default, you are executing transactions that use the STRK token to pay the fees.
Here is an example of how to increase and check the balance:
//initialize provider with a Sepolia Testnet node
const provider = new RpcProvider({ nodeUrl: `${myNodeUrl}` });
// connect your account. To adapt to your own account:
const privateKey0 = process.env.OZ_ACCOUNT_PRIVATE_KEY;
const account0Address = '0x123....789';

const account0 = new Account(provider, account0Address, privateKey0);

// Connect the deployed Test contract in Testnet
const testAddress = '0x02d2a4804f83c34227314dba41d5c2f8a546a500d34e30bb5078fd36b5af2d77';

// read the ABI of the Test contract
const { abi: testAbi } = await provider.getClassAt(testAddress);
if (testAbi === undefined) {
  throw new Error('no abi.');
}
const myTestContract = new Contract(testAbi, testAddress, provider);

// Connect account with the contract
myTestContract.connect(account0);

// Interactions with the contract with meta-class
const bal1 = await myTestContract.get_balance();
console.log('Initial balance =', bal1); // Cairo 1 contract
const myCall = myTestContract.populate('increase_balance', [10]);
const res = await myTestContract.increase_balance(myCall.calldata);
await provider.waitForTransaction(res.transaction_hash);

const bal2 = await myTestContract.get_balance();
console.log('Final balance =', bal2);
Contract.populate() is the recommended method to define the parameters to call/invoke the Cairo functions.
✍️ Send a transaction, paying fees with ETH
You need to be connected to a node using RPC 0.7:
- Define
specVersion: '0.7.1'when instantiating an RpcProvider - Use
config.set('legacyMode', true)to enable V1 transactions (ETH fees) - Use
logger.setLogLevel('ERROR')if you want to remove the warnings when processing V1 transactions
import { RpcProvider, Account, config, logger, ETransactionVersion } from 'starknet';

const myProvider = new RpcProvider({
  nodeUrl: 'https://starknet-sepolia.public.blastapi.io/rpc/v0_7',
  specVersion: '0.7.1',
});

config.set('legacyMode', true);

logger.setLogLevel('ERROR');
With the above settings the code still uses V3 transactions (STRK fees) with RPC 0.7 by default. To utilize V1 transactions (ETH fees) there are two approaches:
- either configure it at the
Accountinstance level by setting the appropriate constructor parameter:
const account0 = new Account(
  myProvider,
  accountAddress0,
  privateKey0,
  undefined,
  ETransactionVersion.V2
);
- or configure it for individual method invocations by setting the corresponding options parameter property:
const res = await account0.execute(myCall, { version: 1 });
Sending sequential transactions
If you intend to send sequential transactions through the contract object, like so:
const tx = await cairo1Contract.array2d_ex(data);
const tx1 = await cairo1Contract.array2d_ex(data);
Be sure to use waitForTransaction between the calls, because you may experience issues with the nonce not incrementing:
const tx = await cairo1Contract.array2d_ex(data);
await provider.waitForTransaction(tx.transaction_hash);
const tx1 = await cairo1Contract.array2d_ex(data);
await provider.waitForTransaction(tx1.transaction_hash);
Write several operations, with Account.execute
In a Starknet transaction, you can include several invoke operations. It will be performed with account.execute.
We will later see this case in more detail in this dedicated guide, but in summary, you use this command with the following parameters:
- address of the contract to invoke
- name of the function to invoke
- and an array of parameters for this function
const result = await account.execute({
  contractAddress: myContractAddress,
  entrypoint: 'transfer',
  calldata: CallData.compile({
    recipient: receiverAddress,
    amount: cairo.uint256(100000n),
  }),
});
await provider.waitForTransaction(result.transaction_hash);
Other existing methods
Some other useful methods to interact with Starknet:
Function name defined in the code
If you want to call a function with its name contained in a variable:
const listFn = ['calc-sum', 'calc-hash', 'calc-proof'];
// fnChoice is a number defined during execution
const res = await myTestContract[listFn[fnChoice]](200, 234567897n, 865423);
Light and fast call
If you want to have a very fast execution, with minimum resource usage:
const specialParameters: Calldata = ['2036735872918048433518', '5130580', '18'];
const getResponse = await myAccount.call('get_bal', specialParameters, { parseRequest: false });
You provide the low-level numbers expected by Starknet, without any parsing or checking. See more details here.
Transaction receipt response
You can interpret the transaction receipt response to check whether it succeeded or not.
const result = await account.execute(myCall);
const txR = await provider.waitForTransaction(result.transaction_hash);

console.log(txR.statusReceipt, txR.value);
console.log(txR.isSuccess(), txR.isReverted(), txR.isError());

txR.match({
  success: () => {
    console.log('Success');
  },
  _: () => {
    console.log('Unsuccess');
  },
});

txR.match({
  success: (txR: SuccessfulTransactionReceiptResponse) => {
    console.log('Success =', txR);
  },
  reverted: (txR: RevertedTransactionReceiptResponse) => {
    console.log('Reverted =', txR);
  },
  error: (err: Error) => {
    console.log('An error occured =', err);
  },
});